Setting up FastStore images
In this guide, learn how to improve your store's image rendering performance by using a CDN to deliver optimized images in WebP and AVIF formats.
This improvement speeds up loading times without compromising image quality, resulting in a better customer experience while navigating your store.
According to the Lighthouse official documentation, WebP and AVIF formats load faster and have better quality than other formats. Using a CDN to deliver images takes the load off the server, ensuring stability and efficient loading even during high-traffic periods, avoiding performance issues or downtime.
⚠️ Apply the steps in this guide to make changes to the
Next.jsstarter andGatsbystarter.
Before you start
FastStore projects can benefit from Thumbor, an image CDN that optimizes images on demand and caches the result on CDN, resulting in improved storefront performance.
To use Thumbor, replace all instances of assets.vtex.app with {accountName}.vtexassets.com in your FastStore project.
For example, change https://assets.vtex.app to https://examplestore.vtexassets.com.
For more information, refer to this release note
Step-by-step
Step 1: Setting up the new images domain.
To enable the use of Thumbor in your store, you need to set up a new domain for your store's images in the .faststore/next.config.js file and point the Thumbor service to the new images domain in the src/components/ui/Image/thumborUrlBuilder.ts file.
In the store’s repository, access
.faststore/next.config.jsfile and add the images’ domain.const storeConfig = require('./faststore.config')
const nextConfig = {
/* config options here */
images: {
domains: [`${storeConfig.api.storeId}.vtexassets.com`],
},Access
src/components/ui/Image/thumborUrlBuilder.tsand point the Thumbor service to the new images domain.import storeConfig from '../../../../faststore.config'
[...]
const THUMBOR_SERVER = `https://${storeConfig.api.storeId}.vtexassets.com`
[...]
Step 2: Use FastStore Image component
We highly recommend optimizing your store's images using the FastStore Image component, which now leverages the Next.js next/future/image component.
The useImage() hook is used to generate image URLs with Thumbor and handle all necessary settings to optimize and serve images from the CDN.
To ensure that the Next.js component uses Thumbor as the image loader, follow these steps:
Navigate to
/src/components/ui/Image/Image.tsx.Pass the
unoptimizedproperty to theNextImagecomponent.Set the value of
srctothumborSrc, which is the URL generated byuseImage()hook.
⚠️ If you are using Gatsby, you should use the
thumborSrcprovided byuseImage()and disable the default loaders if applicable. Alternatively, consider using the<img />tag with the giventhumborSrc.
Here's the implementation of the Image component:
        import { memo } from 'react'

        import NextImage, { ImageProps } from 'next/future/image'
        import { ThumborOptions } from './thumborUrlBuilder'
        import { useImage } from './useImage'

        function Image({ src, width, height, quality, ...otherProps }: ImageProps) {
        const { src: thumborSrc, alt } = useImage({
            src: String(src),
            width: Number(width),
            height: Number(height),
            options: quality ? ({ filters: { quality } } as ThumborOptions) : undefined,
            ...otherProps,
        })

        return (
            <NextImage
            data-fs-image
            unoptimized
            src={thumborSrc}
            width={width}
            height={height}
            alt={alt}
            {...otherProps}
            />
        )
        }

        Image.displayName = 'Image'
        export default memo(Image)
ℹ️ Using the
useImage()hook, the component generates thethumborSrcURL and passes it to thesrcprop of theNextImagecomponent. Theunoptimizedproperty is set to ensure that theNextImagecomponent uses Thumbor as the image loader.
The Image component takes the following props:
| Prop | Description |
|---|---|
src | The image source URL. |
width | The width of the image. |
height | The height of the image. |
quality | The quality of the image. |
otherProps | Additional props to pass to the NextImage component. |
Step 3: Install sharp for Image Conversion in Production Environment
To ensure that your store's images are converted to modern formats such as WebPand AVIF in both development and production environments, you need to install sharp, as recommended by Next.js.
To install sharp, run the following command in the terminal:
yarn add sharp
This will add sharp as a dependency to your FastStore project and enable image conversion in production mode. Make sure to restart your development server after installing it.
With sharp installed, the next/future/image component will automatically convert images to WebP and AVIF formats in both development and production environments.
Validating FastStore Images
To ensure that your images are being served correctly and optimized for performance, you can use the DevTools Network tab. This tool allows you to filter images, check their format, size, and loading time, and determine whether an image originates from the CDN cache.
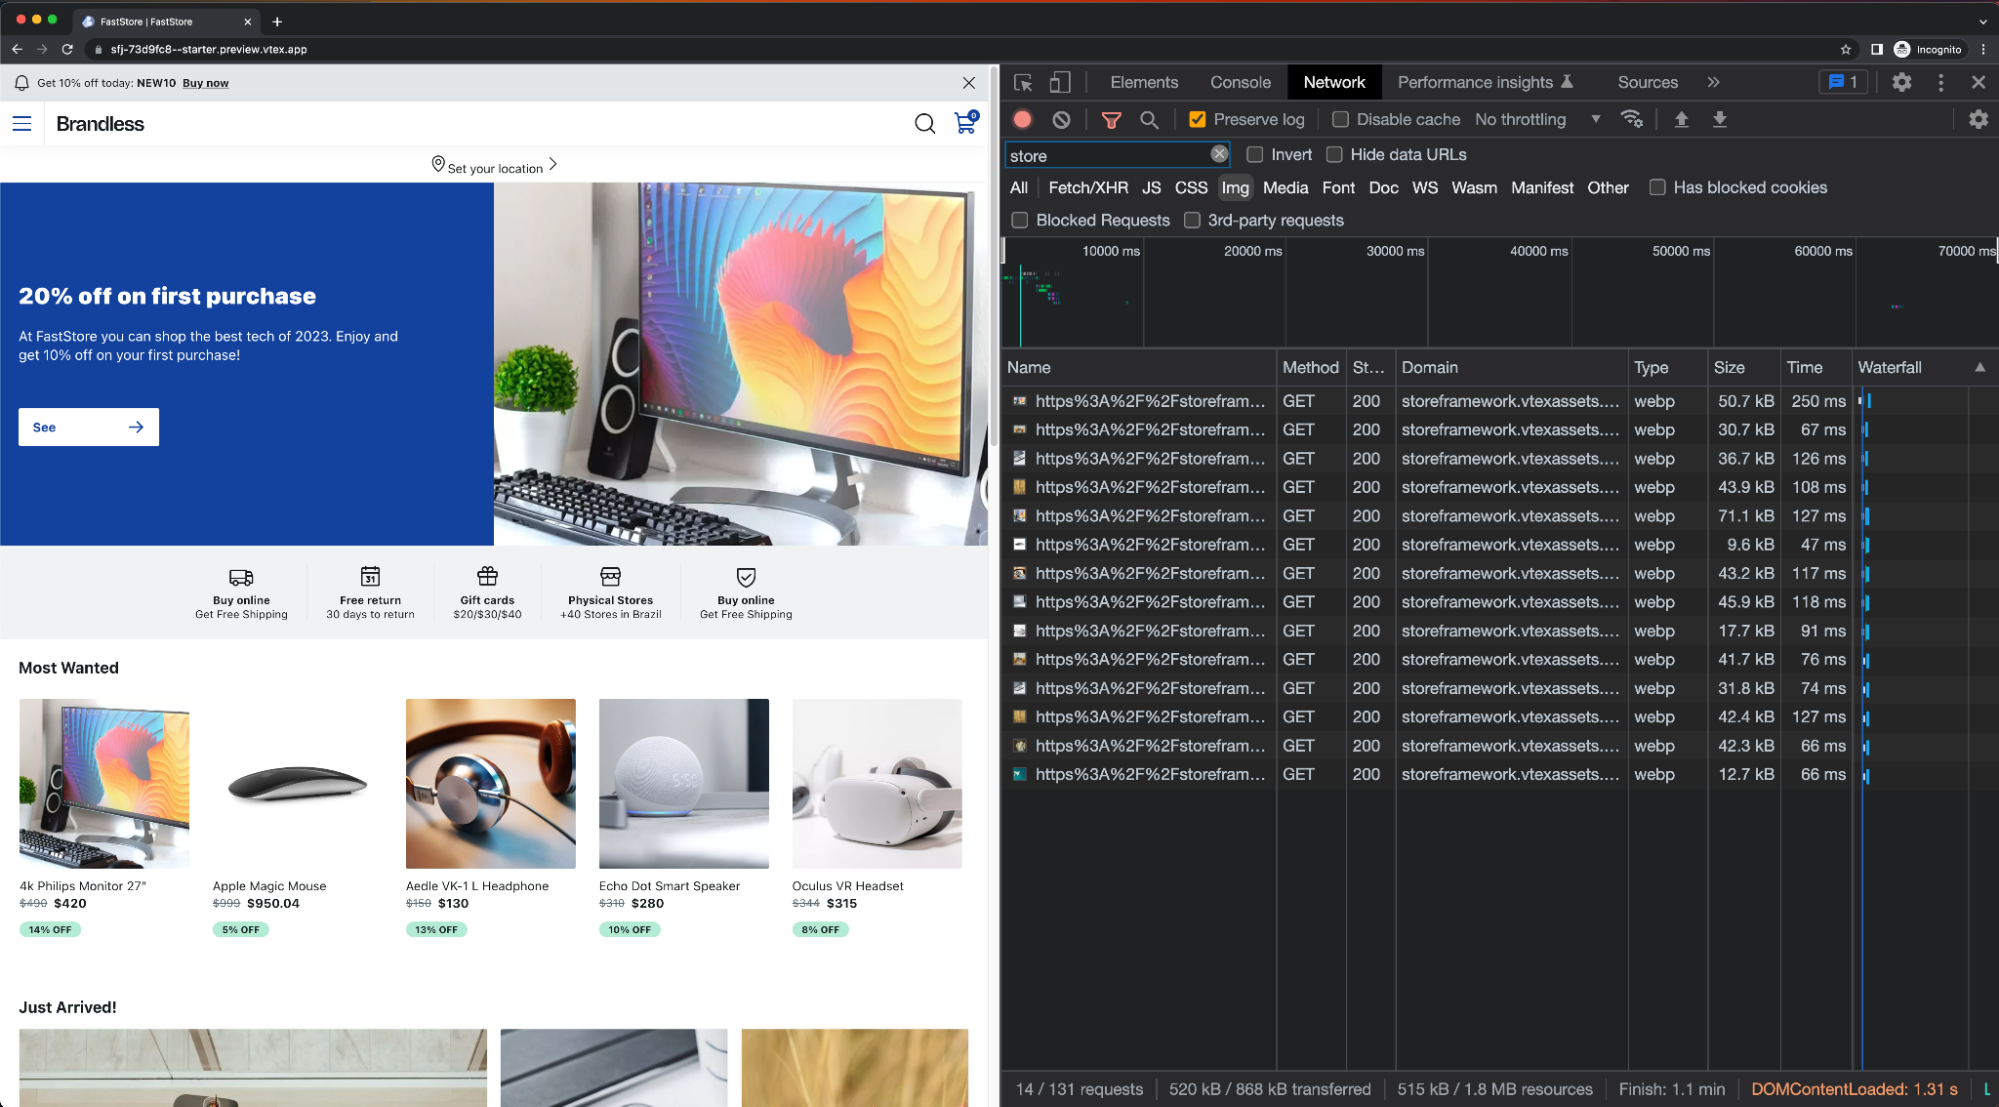
In this example, you can see:
The recommended domain
<Account>.vtexassets.comis being used.The images are in the
WebPformat, which offers better compression and faster loading times thanJPEGorPNG. Despite being smaller in size, the images maintain their quality. Clicking on any of the images reveals more details.

Although the image has the Request URL informed as JPG, which is the format used when uploading it to the VTEX admin in the CMS or Catalog section, the image is being transformed into WebP. You can verify this transformation through the content-type.
It is possible to validate that a CDN cache HIT has occurred through the x-cache header, reducing the time it takes to load the content.
For more details on image conversion on the VTEX platform, see this announcement.